Clip Studio Paint is a powerful tool for digital artists, offering a wide range of features to enhance creativity. One of its unique capabilities is the ability to manipulate images in various ways, including spiralizing them. In this article, we will explore how to spiralize an image in Clip Studio Paint, along with answering related questions such as how to vectorize an image, what Ctrl+B does, how to warp an image, and how to tile an image. This guide is designed to be detailed, informative, and optimized for SEO, ensuring you get the most out of Clip Studio Paint.
Table of Contents
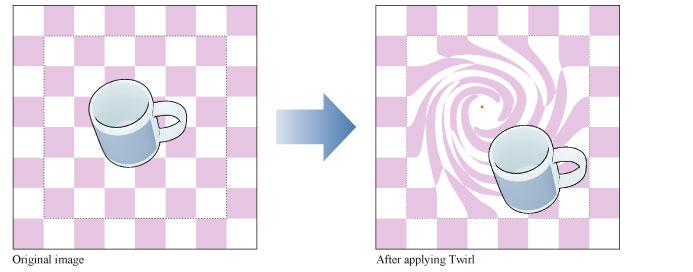
How to Spiralize an Image in Clip Studio Paint
Spiralizing an image in Clip Studio Paint is a creative way to transform your artwork into a unique, swirling design. While Clip Studio Paint does not have a direct “spiralize” tool, you can achieve this effect using a combination of tools and techniques. Here’s a step-by-step guide:
- Open Your Image: Start by importing the image you want to spiralize into Clip Studio Paint. Go to
File > Importand select your image. - Create a New Layer: Always work on a new layer to preserve the original image. Use the
Layermenu to add a new layer. - Use the Mesh Transformation Tool: This tool allows you to warp and distort your image. Select the layer with your image, then go to
Edit > Transform > Mesh Transformation. - Adjust the Mesh Grid: The mesh grid will appear over your image. Drag the control points to create a spiral effect. Start from the center and pull the points outward in a circular motion.
- Refine the Spiral: Use the
Free Transformtool to fine-tune the spiral shape. Adjust the rotation and scaling to achieve the desired effect. - Apply Filters: To enhance the spiral effect, apply filters like
BlurorDistortfrom theFiltermenu. - Save Your Work: Once satisfied, save your spiralized image by going to
File > Export.
By following these steps, you can create stunning spiralized images that stand out in your digital art portfolio.
How to Vectorize an Image in Clip Studio Paint
Vectorizing an image in Clip Studio Paint is a great way to create scalable, high-quality artwork. Unlike raster images, vector images retain their quality when resized. Here’s how to vectorize an image:
- Import Your Image: Start by importing the image you want to vectorize.
- Use the Pen Tool: Select the
Pen Toolfrom the toolbar. This tool allows you to create vector paths. - Trace the Image: Carefully trace the outlines of your image using the Pen Tool. You can adjust the curves and lines as you go.
- Convert to Vector Layer: Once the tracing is complete, convert the layer to a vector layer by right-clicking and selecting
Convert Layer. - Refine the Vector Paths: Use the
Object Toolto adjust the vector paths and ensure they align perfectly with your image. - Add Colors: Use the
Fill Toolto add colors to your vectorized image. - Export as Vector File: Save your work as a vector file format like SVG or AI for scalability.
Vectorizing images in Clip Studio Paint is a valuable skill for creating logos, illustrations, and other scalable designs.
What Does Ctrl+B Do in Clip Studio Paint?
In Clip Studio Paint, keyboard shortcuts are essential for speeding up your workflow. The Ctrl+B shortcut is particularly useful as it opens the Color Balance adjustment menu. Here’s how it works:
- Select Your Layer: Choose the layer you want to adjust.
- Press Ctrl+B: This opens the
Color Balancemenu, where you can adjust the tones of your image. - Adjust Shadows, Midtones, and Highlights: Use the sliders to tweak the colors in different tonal ranges.
- Apply Changes: Click
OKto apply the adjustments to your layer.
The Ctrl+B shortcut is a quick way to enhance the color balance of your artwork, making it more vibrant and visually appealing.
How Do You Warp an Image in Clip Studio Paint?
Warping an image in Clip Studio Paint allows you to bend, twist, and distort your artwork creatively. Here’s how to do it:
- Select Your Layer: Choose the layer containing the image you want to warp.
- Go to Edit > Transform > Warp: This activates the warp tool.
- Adjust the Control Points: Drag the control points to warp the image. You can create curves, bends, and other distortions.
- Use the Mesh Transformation Tool: For more precise control, use the
Mesh Transformationtool underEdit > Transform > Mesh Transformation. - Apply the Changes: Once satisfied, press
Enterto apply the warp.
Warping is a versatile technique that can add dynamic effects to your artwork.
How to Tile an Image in Clip Studio Paint
Tiling an image is useful for creating patterns, backgrounds, or textures. Here’s how to tile an image in Clip Studio Paint:
- Create a New Canvas: Set up a canvas with the dimensions you need for your tiled design.
- Import Your Image: Import the image you want to tile.
- Duplicate the Image Layer: Use
Ctrl+CandCtrl+Vto duplicate the image layer multiple times. - Arrange the Tiles: Move the duplicated layers to create a seamless tiled pattern. Use the
Snap to Gridfeature for precision. - Merge Layers: Once the tiles are arranged, merge the layers to create a single tiled image.
- Save Your Work: Export the tiled image in your desired format.
Tiling is a great way to create repetitive designs for backgrounds, wallpapers, or textures.
Conclusion
Clip Studio Paint is a versatile tool that offers endless possibilities for digital artists. Whether you’re spiralizing an image, vectorizing artwork, warping designs, or creating tiled patterns, this software has the tools you need to bring your creative vision to life. By mastering these techniques, you can elevate your digital art and explore new dimensions of creativity.